Installation

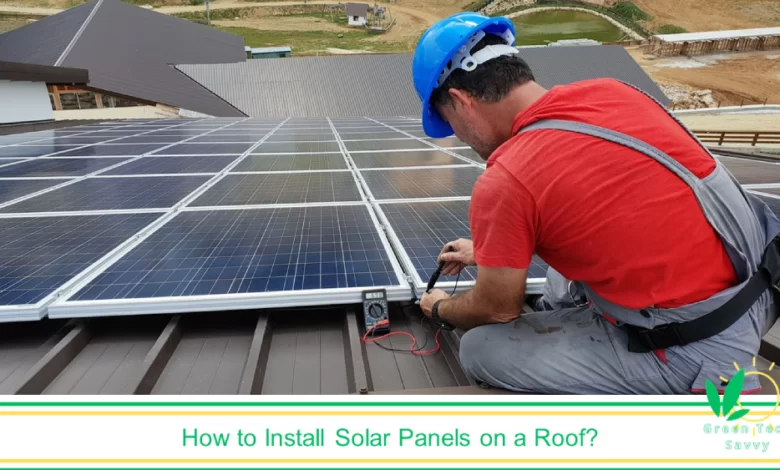
How to Install Solar Panels on a Roof?
To install solar panels there are 11 steps including selection of appropriate solar panels and inverters, securing necessary permits, mounting the panels on rooftops or ground structures, wiring the system, connecting to inverters, and ensuring compliance with local regulations. Solar panel installation is the step-by-step process of setting up solar panels to harness solar power and convert it into electricity. The solar panel hooking also includes testing the system, commissioning, and potentially integrating with the grid or a battery storage system, followed by ongoing monitoring and documentation of the installation.
To answer the question of how long does it take to install solar panels? Installing solar panels and connecting them takes 4 to 6 hours. The exact duration differs according to the system’s size. For most home solar panels, the entire installation is completed in a single day.
Connecting solar panels is the process of wiring the panels together to form a solar array. Connecting solar panels involves planning the wiring configuration, select the appropriate electrical conversion method, and then securely mount the panels with proper spacing to allow ventilation and prevent shading. Connect the panels according to the chosen configuration. Use suitable wiring and connectors, ensuring waterproof and UV-resistant options for durability. Then, connect the panels to the chosen inverter, ground the system, and link it to the electrical panel with a dedicated circuit breaker.
After installing and connecting solar panels, you can add new panels the existing system or a new system. You can add the new panels and install them your self (DIY). To install your solar power you need 20 main tool including power drill, safety equipment, and a multimeter to tell if solar panels are working correctly. Before installing your panels, make sure you have a permit from the jurisdictions require.
This article answers the following questions: How to Install Solar Power on a Roof? How to Connect Solar Panels? How to Add Solar Panels to Existing System? Can I Install My Own Solar Panels? What are Solar Installation Tools? How do you Check if Solar Panels are working correctly? Can You Install Solar Panels Without a Permit?
How to Install Solar Power?
To install solar panels there are 11 steps including roof assessment, selection of appropriate solar panels and inverters, securing necessary permits, waterproofing the roof, wiring the system, connecting panels. Solar power installation on a roof is the process of securely attaching solar panels to the structure of a building’s roof to harness solar power for electricity generation.
The goal of Solar power installation process is to optimize the orientation and tilt of the panel for maximum sunlight exposure while ensuring the roof’s structural integrity is maintained.
Roofs facing south in the Northern Hemisphere (and north in the Southern Hemisphere) are generally ideal. A moderately pitched roof (between 15 to 40 degrees) is often considered optimal for solar panel installation. This range allows for efficient sunlight capture without creating excessive shading.
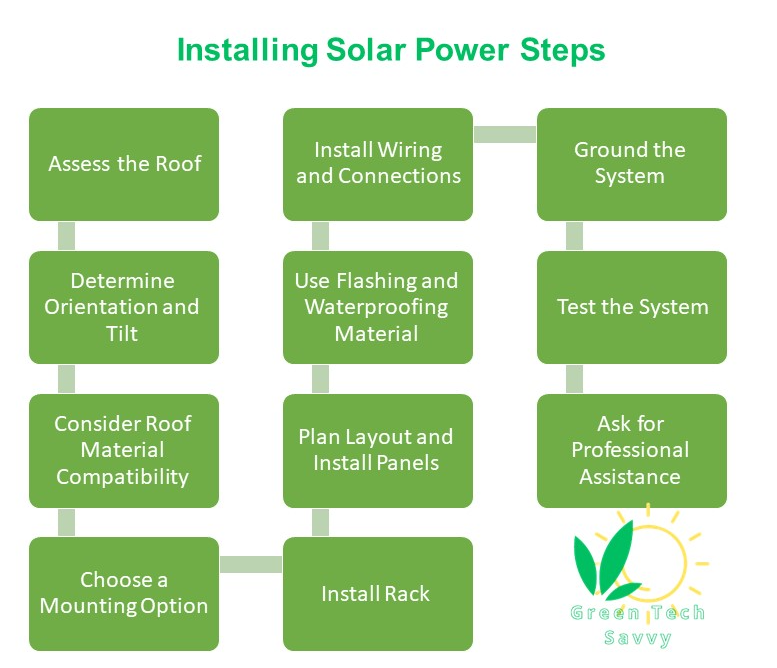
The following figure shows the 11 steps to install solar power.

In the following list there are 11 steps to install solar power step by step.
- Assess the Roof
- Determine Orientation and Tilt
- Consider Roof Material Compatibility
- Choose a Mounting Option
- Install Mounting Rack
- Plan Layout and Install Panels
- Use Flashing and Waterproofing Material
- Install Wiring and Connections
- Ground the System
- Test the System
- Ask for Professional Assistance
Assess the Roof
Begin by assessing the condition and structure of the roof. Ensure that it supports the additional weight of the solar panels. Check for any existing damage or areas that need repair before installation.
Determine Orientation and Tilt
Determine the optimal orientation and tilt degree of the solar panels to maximize sunlight exposure and energy production. The ideal direction is usually facing south in the Northern Hemisphere and north in the Southern Hemisphere. The perfect tilt is between 15 to 40 degrees.
Consider Roof Material Compatibility
Take into account the roofing material used on your residence. Different mounting methods are used for asphalt shingles, metal roofs, tile roofs, or flat roofs.
Use appropriate flashing and mounting equipment compatible with the roof material to maintain its integrity.
Choose a Mounting Option
Choose between roof-integrated or rack-mounted systems. Roof-integrated systems integrate the solar system directly into the structure of the roof. Rack-mounted systems attach panels to a mounting structure.
Install mounting racks
Install the mounting racks on the roof using appropriate anchors and fasteners, if using a rack-mounted system. Follow the factory’s guidelines, for spacing and alignment. Ensure that the racks are level and securely attached to the roof.
Use Flashing and Waterproofing Material
Use high-quality sealants and waterproofing materials to secure the flashing and maintain the roof’s integrity.
Flashing is a metal or other weather-resistant material installed around the penetrations on the roof where the solar panels are attached. Flashing is used to create a watertight seal between the solar panels and the roof surface. Install flashing around the mounting brackets to create a waterproof seal.
Plan Layout and Install Panels
Plan the layout of the solar panels on the mounting structure, ensuring proper spacing and alignment for optimal energy production.
Secure the solar panels to the mounting racks, following the manufacturer’s guidelines for panel spacing and tilt angles.
Tighten all bolts and fasteners securely to prevent movement and ensure stability.
Install Wiring and Connections
Install wiring from the solar panels to a designated connection point, typically a junction box. A junction box is an electrical box integrated into the backside of each solar panel. It is used for electrical connections of the solar panel system.
Use appropriate conduits and connectors to protect the wiring from environmental elements and pests.
Ensure that the wiring follows a neat and organized path to the inverter or combiner box.
Ground the System
Grounding solar panels is connecting the solar panels and associated components to the Earth or a grounding system to ensure electrical safety. Grounding prevents the buildup of excess voltage and provides a path for the safe dissipation of electrical currents.
Grounding installed panels according to local electrical codes. Grounding involves connecting the metal frames of the solar panels, mounting racks, and other conductive elements to a grounding conductor, which is then connected to a grounding electrode or the building’s grounding system.
Test the System
Test the entire installation Before connecting the system to the grid or using solar power.
Check the electrical connections, measure voltages, and ensure that all components are functioning correctly.
Ask for Professional Assistance
If you’re unsure about any aspect of the installation, especially regarding structural integrity or electrical connections, consider seeking professional assistance to ensure a safe and reliable installation.
How to Connect Solar Panels?
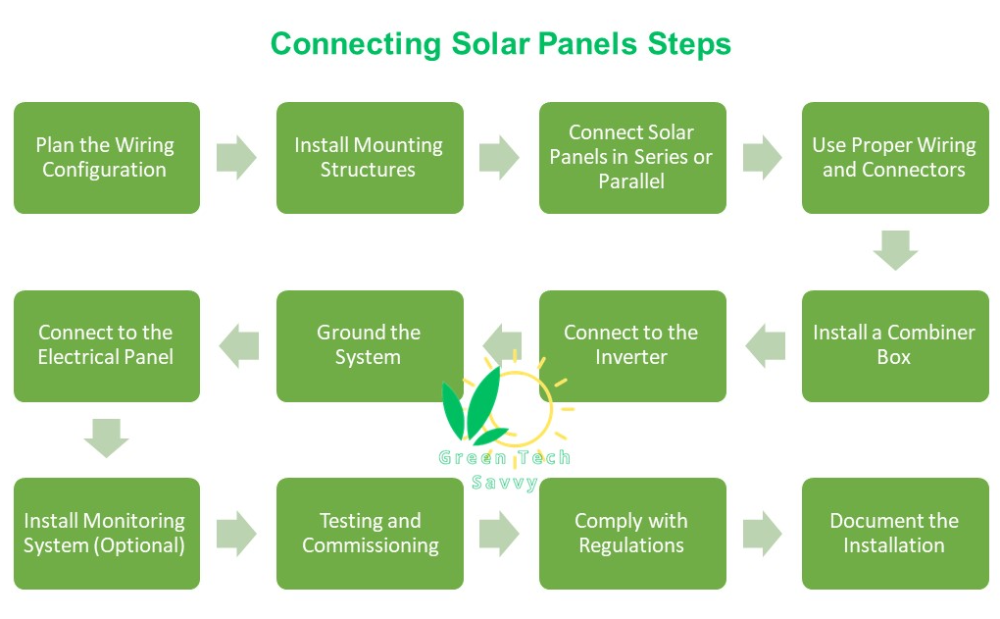
To connect solar panels connection there are 12 steps to ensure a safe and efficient electrical setup. The 12 steps of connecting solar panels are shown in the following figure.

In the following list there are 12 steps to connect solar panels step by step.
- Plan the Wiring Configuration.
- Install Mounting Structures.
- Connect Solar Panels in Series or Parallel.
- Use Proper Wiring and Connectors.
- Install a Combiner Box.
- Connect to the Inverter.
- Ground the System.
- Connecting solar panels to house wiring.
- Install Monitoring System (Optional).
- Testing and Commissioning.
- Comply with Regulations.
- Document the Installation.
Plan the Wiring Configuration
Determine the wiring configuration based on the number and type of solar panels you have. Common configurations include series and parallel wiring.
Decide whether you want use a string inverter, microinverters, or power optimizers for the electrical conversion.
Install Mounting Structures
Mount the solar panels on a secure and durable structure, whether on a roof or other mounting surface.
Ensure proper spacing between panels to allow for ventilation and prevent shading.
Connect Solar Panels in Series or Parallel
Connect the positive terminal of one panel to the negative terminal of the next, In a series configuration. Series configuration increases the voltage.
connect the positive terminals and the negative terminals together, in a parallel configuration. Parallel configuration increases the current. Follow the manufacturer’s specifications for the specific type of solar panels you are using.
Use Proper Wiring and Connectors
Choose appropriate wires and connectors with the correct gauge to handle the current and voltage of the solar panels. Use waterproof and UV-resistant connectors to ensure durability and longevity.
Install a Combiner Box
Install a combiner box for larger solar panel arrays. This consolidates the wiring from multiple strings of panels into a single output. The combiner box includes over current protection devices, such as fuses or circuit breakers.
Connect to the Inverter
Connect the output from the solar panels to the input of the inverter, for a string inverter,.
Connect each solar panel directly to its respective inverter unit, for microinverters or power optimizers.
Ground the System
Ensure that the solar panel system is properly grounded to prevent electrical hazards. Connect the grounding wire to the metal frames of the solar panels and other components.
Follow local electrical codes and regulations for grounding.
Connecting Solar Panels to House Wiring
Connect the output of the inverter to the electrical panel or distribution board.
Install a dedicated circuit breaker for the solar panel system in the electrical panel.
Install Monitoring System (Optional)
Install a monitoring system to track the performance of the solar panels. A Monitoring System is a set of tools and equipment designed to observe and collect data on the performance of the solar panel system. Installing a monitoring system allows you to monitor energy production, detect any issues promptly, and optimize the overall efficiency.
Testing and Commissioning
Conduct a thorough test of the entire solar panel system to ensure proper functioning.
Verify voltage, current, and overall performance according to the manufacturer’s specifications.
Comply with Regulations
Ensure that the installation complies with local electrical codes, building permits, and any applicable regulations.
Document the Installation
Keep detailed records of the installation, including wiring diagrams, specifications, and any modifications made to the system.
How to Add Solar Panels to Existing System?
To add solar panels to an existing system you must consider 3 factors are inverter capacity, panel compatibility, and overall system efficiency.
Adding solar panels to an existing system is done in several ways (adding more panels with the same inverter, adding more panels and replacing inverter, installing a new solar system)
Add More Panels With the Same Inverter
You can add solar panels to an existing system by having your original installer add more of the same PV panels to your existing system.
Ensure that the total kilowatt capacity of your solar panels doesn’t exceed a certain limit to avoid the need for an additional inverter or one with higher energy capacity.
Inverters handle a panel array with a peak power of up to 133% of their capacity due to natural power loss during transfer, providing some flexibility.
Adding solar panels to an existing system is viable if your original installer is able add identical panels to your existing system.
Add More Panels After Replacing Your Inverter with a Larger One
You can add solar panels to an existing system by upgrading your inverter.
Newer, larger inverters can enhance overall system efficiency and accommodate newer, more efficient PV panels. Inverters with multiple inputs allow you to easily add solar panels to the existing system, All connected to a single inverter.
Install a New Solar System Separately
Set up an additional system with its own set of panels, inverters, and battery backups.
This option provides a separate warranty, independent of compatibility with the old solar system.You can claim an additional rebate for the new system, making it cost-effective.
Can You Install Your Own Solar Panels?
Yes, you can install your own solar panels if you have the necessary skills, knowledge, and confidence to handle electrical and construction work. In the following list there are 7 critical considerations to keep in mind when installing your system yourself.
- Skill Level. Installing solar panels involves electrical work, roofing, and potentially structural considerations. Ensure you have the skills required for each aspect of the installation.
- Safety. Working with electricity and being on a roof pose inherent risks. Make sure you follow safety guidelines, use appropriate personal protective equipment, and take necessary precautions.
- Local Regulations. Some areas require professional installation or inspection to ensure compliance with safety and electrical standards.
- Permits. Obtain any necessary permits for the installation. Local authorities require approval before you start the project.
- Warranty and Rebates. Installing solar panels yourself might impact warranties or eligibility for rebates. Some manufacturers and incentive programs require professional installation.
- System Design. Ensure the solar panel system is designed appropriately for your energy needs, location, and roof characteristics. This involves understanding electrical capacity, shading, and orientation considerations.
- Equipment Compatibility. Verify that all components, including inverters and mounting systems, are compatible with the solar panels and meet safety standards.
To install solar panels yourself, you need 20 installation tools and equipment (power drill, wire strippers, wire management Tools). Also, to install solar panels yourself, you need permits from your jurisdictions.
What are Solar Installation Tools?
Solar installation requires 20 tools including (power drill, multimeter, and tool bag or toolbox) to ensure a safe and effective setup.
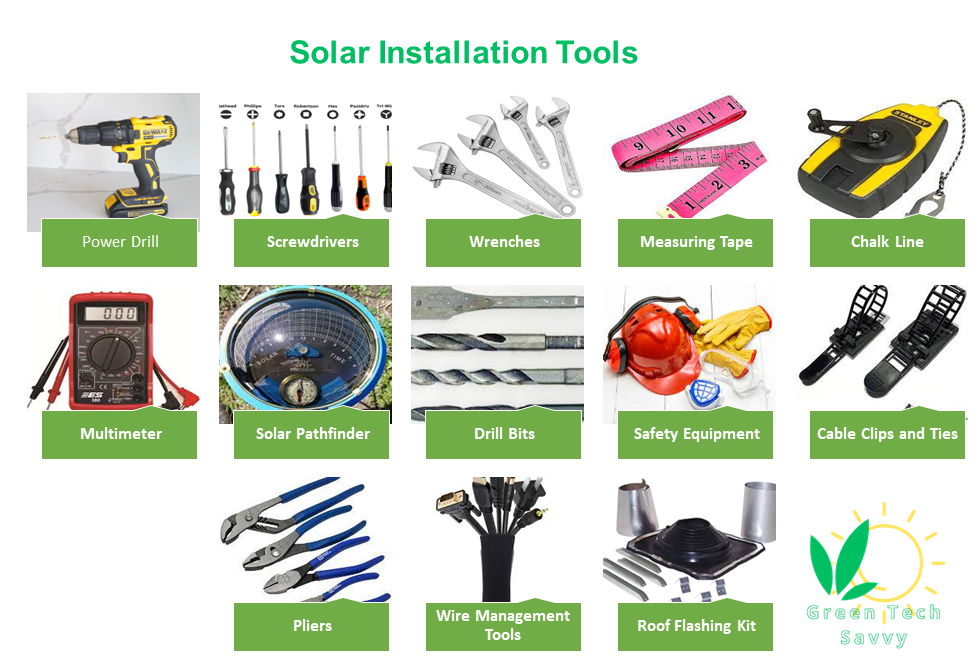
The 20 solar installation tools are shown in the following picture.

The 20 solar installation tools are explained in the following list.
- Power Drill. It is used for drilling holes in various materials, including roof structures and mounting racks.
- Screwdrivers. Both flathead and Phillips screwdrivers for securing solar panels, brackets, and other components.
- Wrenches. Adjustable wrenches or socket wrenches are needed to tighten nuts and bolts during the installation process.
- Wire Strippers Strip. The insulation from electrical wires, allowing for proper connections.
- Crimping Tool. Utilized to crimp connectors onto electrical wires securely.
- A torque wrench. It ensures bolts and nuts are tightened according to the manufacturer’s specifications, preventing both over-tightening and under-tightening.
- Ladder. It is used for accessing the roof or elevated areas where solar panels are installed.
- Level. It ensures that solar panel racks and mounts are installed correctly and leveled.
- Measuring Tape. It is used for precise measurements during the layout and positioning of solar panels and mounting structures.
- Chalk Line. It helps in marking straight and level lines on surfaces, aiding in the accurate placement of solar components.
- Caulk Gun. Apply sealants and adhesives to ensure waterproofing and weatherproofing of connections.
- Solar Pathfinder. A tool that assesses shading patterns at the installation site to optimize the placement of solar panels.
- Safety Equipment. Personal protective equipment, including gloves, safety glasses, and a hard hat, to ensure the installer’s safety during the installation process.
- Drill Bits. They are used for drilling into different materials, such as wood, metal, or concrete.
- Cable Clips and Ties. They are used to secure and organize electrical cables, preventing them from becoming tangled or damaged.
- Pliers. Needle-nose pliers and other types for gripping, bending, or cutting wires.
- Roof Flashing Kit. It Ensures proper waterproofing around roof penetrations created during the installation process.
- Wire Management Tools. Cable trays, conduits, and clips to organize and secure wiring neatly and efficiently.
- Tool Bag or Toolbox. It Keeps all tools organized and easily accessible during the installation process.
- Multimeter. It Measures voltage, current, and resistance, allowing for testing and troubleshooting electrical components.
After installing the panels, you should use multimeter to check if they are working correctly.
How to Check if Solar Panels are Working Correctly?
To check if your solar panels are working correctly, after installing them, use multimeter (Voltmeter). A multimeter or voltmeter is a versatile tool that measure voltage, current, and resistance. Use multimeter to measure the voltage output of the solar panels. Make sure to measure the voltage under sunlight conditions. To know how to tell if solar panels are working correctly, consider installing solar monitoring for continuous real-time assessment.
Can You Install Solar Panels Without a Permit?
Local and state regulations vary, but most jurisdictions require permits for solar panel installations. Permits are essential to ensure that the installation complies with safety, electrical, and building codes.
Installing solar panels without the required permits result in legal consequences, fines, and even the need to remove the system. Moreover, Installing solar panels without the permits impact the eligibility for incentives, rebates, and certifications associated with solar installations.
To install solar panels legally and responsibly, check with local authorities, obtain the required permits, and comply with all relevant regulations.